This tutorial is broken into three pieces, documenting the three major events in “test_ai.map”. Make sure you play through the map “test_ai” so you see what we will be setting up in each part of the tutorial.
PART I - Rendezvousing with your allied soldiers
PART II - Your first enemy encounter and destroying the Flak-88
PART III - Setting up an MG-42 gunner and making 2 enemies jump out of a truck
PART I - Rendezvousing with your allied soldiers
We are going to work with the .map file and the .scr file at the same time so that after we complete each part you will be able to run your bsp and see your AI in action. Build a map with a ground and a sky box to start.
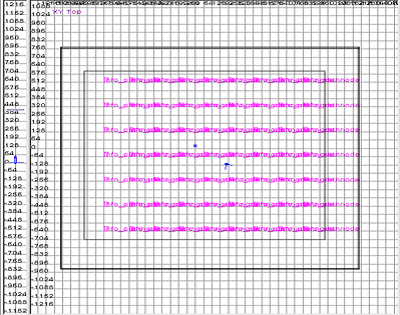
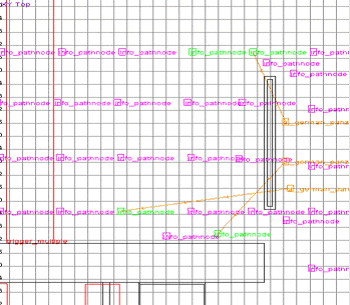
If you open the “test_ai.map” the first thing you will see is the color purple all over the map. Those are the AI nodes, that set up the paths the AI will walk along. You will want to add them to your map, placing them everywhere you want AI to be able to go. The max distance that two nodes can be from each other is 320 units. If two nodes are further away than that they will not connect to each other. If you want to see what I mean by connected, play the “test_ai.bsp” in MOH, bring down the console and type ai_showroutes 1. This will show you all the AI node paths and how they connect to each other. Now that you know what a node is, set your info_path_nodes by right clicking on the grid and selecting “info” -> “pathnode”. Make sure that your pathnodes are waist high from the side or front view, if they are under the ground brush the AI will not be able to find them. Once you have all of your pathnodes set up we can starting adding the AI.
Setting up your script file.
exec global/auto.scr

level waittill prespawn
level waittill spawn

//----------------------------------------------------------------------------
main:
//----------------------------------------------------------------------------
	waitthread InitPlayer
end

//----------------------------------------------------------------------------
InitPlayer:
//----------------------------------------------------------------------------
	// setup our player with weapons
// This gives the player the default weapons that they will start the level with.
	$player takeall
	$player item weapons/Webley_Revolver.tik
	$player item weapons/enfield.tik
	$player item weapons/sten.tik
	$player item weapons/mills_grenade.tik
	$player item weapons/M18_smoke_grenade.tik

	// give him some ammo
	$player ammo pistol 32
	$player ammo smg 128
	$player ammo rifle 50
	$player ammo smokegrenade 3
	$player ammo grenade 3

	// start out using the smg
	$player useweaponclass smg

	// give him binoculars and the explosive icon...
	$player item items/binoculars.tik

	//These two lines add the binoculars and explosive image to the top right of the HUD
	waitthread global/items.scr::add_item "binoculars" noprint	// Show binoculars inventory icon
	waitthread global/items.scr::add_item "explosive"	noprint // Show explosive inventory icon

	end
So far all our script does is set the player up with default weapons, amount of ammo, amount and type of grenades and items(binoculars). To test this out, place a player start in your map by right clicking on the grid and selecting “info” -> “player” -> “start”.
Now lets go to our map file and add in our friendlies. Create a brush and press “n” to open your entity window and select “ai_allied_1st-ranger_captain”. Now press ”i” to bring up your AI parameters.
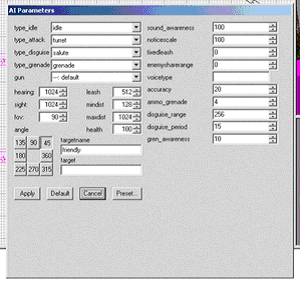
Hit “Default”, enter “friendly” into the $targetname and press “apply”. Close the window and open your “Entity” window. Enter the following into the Key and Value fields.
Key: #fnum
Value: 1
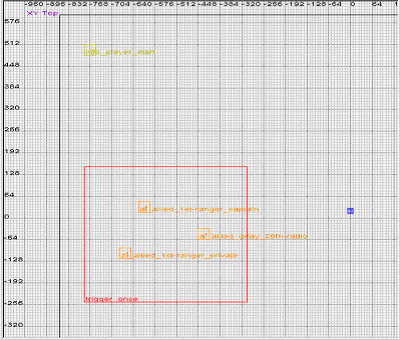
Add a “ai_allied_1st-ranger_private” and a “ai_allied_dday_29th-radio”, making sure that the $targetname for all three of them is “friendly”. For the private, make the #fnum 2 and the 29th-radio #fnum 3. Finally, we have to make a trigger around the AI. Create a brush that surrounds all the AI friendlies and covers a path that the player will walk through. Right click on the grid and select “trigger” -> “once”. Open the “Entity” window and give it a $targetname “friend_trigger”. Lets move to the script so that we can test our new friendlies and make sure they are working correctly.
Add the following lines to your script:
Note: First we will add some objectives. Even though we haven’t completed all the objectives yet we are going to add them all in now.
//----------------------------------------------------------------------------
InitObjectives:
//----------------------------------------------------------------------------

	waitthread global/objectives.scr::add_objectives 1 1 "Rendezvous With Your Allies" $cappy.origin
	waitthread global/objectives.scr::add_objectives 2 1 "Locate and Destroy Artillery Emplacements[1 remaining]" $flak88A.origin
	waitthread global/objectives.scr::add_objectives 3 1 "Clear area of Nazis." $trigger300.origin
	waitthread global/objectives.scr::add_objectives 4 1 "Destroy enemy tanks." $aagun.origin

	// Turn on objective #1 and set it as current objective.
	waitthread global/objectives.scr::add_objectives 1 2
	waitthread global/objectives.scr::current_objectives 1

	end


//----------------------------------------------------------------------------
InitFriends:
//
//	Setup our friendlies to wait until the player shows up...
//----------------------------------------------------------------------------

	// rename our friendlies to something more "friendly"
	level.friendly1.targetname = cappy
	level.friendly2.targetname = friend2
	level.friendly3.targetname = friend3

	thread FriendWait

	end
This renames your friends to something more readable and easier to use.
//----------------------------------------------------------------------------
FriendWait:
//
//	wait for player to hit our trigger..
//
//----------------------------------------------------------------------------

	$friend_trigger waittill trigger

	// objective was accomplished, check it off...
	waitthread global/objectives.scr::add_objectives 1 3

	// set objective #2 as current...
	waitthread global/objectives.scr::add_objectives 2 2
	waitthread global/objectives.scr::current_objectives 2

	// show our throbbing box now.
	//$ThrobbingBox show		Don’t need this just yet

	// Have some sample dialog with the player.
	$cappy turnto $player
	$cappy lookat $player
	wait 0.2
	$cappy anim 11b100_BritCaptGreet
	$cappy waittill animdone

	$cappy anim 12C105_Dialogue03
	$cappy waittill animdone

	$cappy turnto NULL
	$cappy lookat NULL

	// Tells the AI to move to the player
	$cappy.destination	= $player
	$friend2.destination	= $player
	$friend3.destination	= $player

	// Sets the type of friendly soldier
	$cappy.friendtype		= 1
	$friend2.friendtype	= 1
	$friend3.friendtype	= 1

	// stagger how far away they keep from their destinations
	$cappy.distance		= 175
	$friend2.distance		= 225
	$friend3.distance		= 250

	// setup the friendlies to follow the player...
	$cappy   thread global/friendly.scr::friendlythink
	$friend2 thread global/friendly.scr::friendlythink
	$friend3 thread global/friendly.scr::friendlythink

	end
Add the following lines to main.
	waitthread InitFriends
	waitthread InitObjectives
Now your main should look like this:
//----------------------------------------------------------------------------
main:
//----------------------------------------------------------------------------

	waitthread InitPlayer
	waitthread InitFriends
	waitthread InitObjectives

	end
We are all done with adding friendly soldiers. Now lets move on to enemy soldiers.
PART II Your first enemy encounter and destroying the Flak-88
Again we will start with the map file. Create a brush, pull up your “Entity” window and select “ai_german_panzer_grenadier”. Press “i” to pull up the AI parameters, set everything to default and give it a $targetname “enemyspawner”. Open the “Entity” window and enter the following values for the Key and Value fields:
Key: #set
Value: 100
With your enemy entity selected hold down shift and select one of your info_pathnodes. The pathnode that you select will be where your enemy AI runs to once you have triggered them. Press (ctrl + k) to target the pathnode. It will draw a line connecting your enemy AI to the pathnode. Set up two more enemy AI the same way. Give them all the same $targetnames and #set numbers. That way you can control the whole group instead of each one individually.
Make a trigger with a $targetname name “trigger100” the same way you did for the friendly AI so as the player approaches the enemy AI they will walk through it. Make sure there is a wall in front of where your enemy AI is b/c we are going to spawn them in when the player hits the trigger. That means if the wall isn’t there, when you hit the trigger the enemies will appear out of thin air. Set something up like this:
Finally we are going to make our Flak-88 so that the player can use it and also plant a bomb on it. Create a brush, bring up your “Entity” window and select “turretweapon_german_flak88”. Enter the $targetname “flak88A”. Create another brush, bring up your “Entity” window and select “ThrobbingBox_ExplodePlayerFlak88”. Give it a $targetname “ThrobbingBox” and a setthread “ArtilleryDestroyed”. While the throbbing box is still selected, select the flak88 and press (ctrl + k) to target the flak88.
Lets move on to our script. Add the following lines of code to your script:
//----------------------------------------------------------------------------
InitEnemies:
//
//	Setup all the triggers to spawn in the enemy.
//----------------------------------------------------------------------------

	thread SpawnSet100
	//thread SpawnSet200
	//thread SpawnSet300	Don’t need these yet

	end

//----------------------------------------------------------------------------
InitArtillery:
//
//	setup various parameters for the artillery in the level.
//----------------------------------------------------------------------------

	$flak88A_turret0 turnspeed 15	// Adjust the turn speed
	$flak88A_turret0 pitchspeed 7.5	// Adjust the pitch speed
	$flak88A_turret0 viewjitter 7
	$flak88A_turret0 firedelay 4
	$flak88A_turret0 maxyawoffset 20.0
	$flak88A_turret0 pitchcaps "20 10 0"

	// setup collision for base of flak88
	$flak88A.collisionent = $flak88A_collision

	// setup collision for the turret of the flak88
	$flak88A_turret0.collisionent = $flak88A_turret_collision

	end

//----------------------------------------------------------------------------
SpawnSet100:
//
//	Spawn AI set 100
//
//----------------------------------------------------------------------------
	// Once the player activates the trigger the enemy AI will spawn and walk along their paths.
	$trigger100 waittill trigger
	thread global/ai.scr::spawnset 100 spawn100

	end

//----------------------------------------------------------------------------
ArtilleryDestroyed:
//
//	This get's called from the ThrobbingBox when the explosion happens.
//----------------------------------------------------------------------------

	// complete objective #2
	waitthread global/objectives.scr::add_objectives 2 3

	// show objective #3
	waitthread global/objectives.scr::add_objectives 3 2

	// make objective #3 current
	waitthread global/objectives.scr::current_objectives 3


	end
Add this to your main thread:
waitthread InitEnemies
waitthread InitArtillery

// Hide our throbbing box for objective #2 until player completes objective #1
$ThrobbingBox hide
Edit this line of code in FriendWait by removing the “//” before $ThrobbingBox show.
// show our throbbing box now.
$ThrobbingBox show
PART III - Setting up an MG-42 gunner and making 2 enemies jump out of a truck
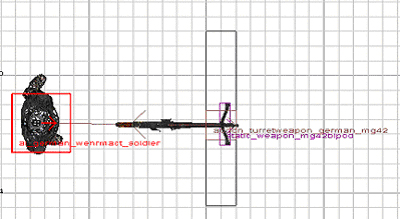
Create a brush where you can rest the MG-42 on. Create another brush, bring up your “Entity” window and select “static_weapon_mg42bipod” and place it on top of your brush for the MG42. Now create another brush, open your “Entity” window, select “addon_turretweapon_german_mg42” and line it up with your bipod that you just created. Add a $targetname “mg42”. Create another brush, open your “Entity” window and select “ai_german_wehrmact_soldier”. Press “i” to bring up your “AI Parameters” window, adjust hearing and sight to 2048 and enter the $targetname “mg42_guy”. Now deselect the german soldier and select the MG42. While the MG42 is still selected also select the mg42_guy and press (ctrl + k) to target the mg42 to the enemy AI.
Add the following code to your script:
//----------------------------------------------------------------------------
InitMG42s:
//
//		Initialize MG42s in the level...
//----------------------------------------------------------------------------

	if ( self==NIL )
	{
		println "No MG42s in level."
		end
	}

	self maxyawoffset 70.0
	self pitchcaps "-20 20 0"
	self AIbulletspread 350 175
	self convergetime 0.25

	end
Add the following line to main:
$mg42 waitthread InitMG42s
Now we have our German manning the Mg42.
In “test_ai.map” we have two more sets of German soldiers. To add them, create the AI the same way you did above but change the Value of the second group of soldiers to:
Key: #set
Value: 200
Change the third group of soldiers to #set 300. Keep the $targetname of the soldiers the same “enemyspawner”. You will have to add a trigger with a $targetname “trigger200”. For the third set of soldiers we will be using the same trigger that activates our truck, so don’t add that just yet and leave room with the third group so that you can add the truck. Add the following code to your script to make the rest of the AI come alive.
//----------------------------------------------------------------------------
SpawnSet200:
//
//	Spawn AI set 200
//
//----------------------------------------------------------------------------

	$trigger200 waittill trigger
	waitthread global/ai.scr::spawnset 200 spawn200


	end

//----------------------------------------------------------------------------
SpawnSet300:
//
//	Spawn AI set 300
//
//----------------------------------------------------------------------------

	$trigger300 waittill trigger
	waitthread global/ai.scr::spawnset 300 spawn300

	level.bad_guys_left = 0

	$spawn300 thread BadGuyCheck

	thread TruckGO

	end


//----------------------------------------------------------------------------
BadGuyCheck:
//
//	Counts the bad guys that are spawned in and when they are all dead,
//	updates the objective as complete.
//----------------------------------------------------------------------------
	level.bad_guys_left++
	self waittill death
	level.bad_guys_left--


	if ( level.bad_guys_left==0 )
	{
		// Complete objective 3!
		waitthread global/objectives.scr::add_objectives 3 3

		// go on to objective 4.
		waitthread global/objectives.scr::add_objectives 4 2
		waitthread global/objectives.scr::current_objectives 4
	}

	end
Lets look at how to get the truck working.
Create a brush, open your “Entity” window and select “addon_vehicle_german_Opel-Truck-Green”. Give your truck a $targetname “truck”. You are going to need to add the collision for the truck, but you can take the collision out of “test_ai.map” b/c it is already built for you. (To get a better understanding of how to get the truck moving and attach it to the collision read the tutorial “driving_tutorial2.doc”.) Instead of creating your own bounding box, copy the one from “test_ai.map” in the SDK. To do so, open the map file and select one of the pieces from the bounding box and then press (crtl + e) to select all pieces of the bounding box. With the bounding box selected open your map. When it asks, copy selection, click yes. This will bring the bounding box of the vehicle into your map. Deselect the vehicle mask and select the truck entity image. Open the “Entity” window and enter the following into the Key and Value fields.
Key: target
Value: TruckCollision
Now you need to create your vehicle way points. Right click on the grid and select “info” -> “vehiclepoint”. Give it a $targetname of “truck_path”. Now create the rest of your waypoints make sure to connect the point before it.
Make sure you place a trigger to get the truck moving, use trigger_multiple and $targetname “trigger300”.
After you have read that the only thing you will have to do is add a new line to the script. Here is the script :
//----------------------------------------------------------------------------
TruckGO:
//
//	Send a truck into the mix...
//----------------------------------------------------------------------------

	// setup truck with 2 passengers..
	$truck waitthread gags/t3l1_enemyspawn.scr::DoTruck 1800 2 0

	// Set the type of guns the passengers will use...
	$truck.passenger[1] gun "mp40"
	$truck.passenger[2] gun "Mauser KAR 98K"


	$trigger_truck waittill trigger
//	$truck playsound opeltruck_snd_start
	wait .5
	$truck vehicleanim idlelights
	// make truck go and wait till it's done moving...
	$truck waitthread gags/t3l1_enemyspawn.scr::TruckDrive $truck_path 0 400 0 0 0
	// turn off our lights when we get here....
	wait .5
//	$truck_1 playsound opeltruck_snd_stop
	$truck_1 vehicleanim idlenolights


	end
The important line here is:
$truck waitthread gags/t3l1_enemyspawn.scr::DoTruck 1800 2 0
This line creates the AI in the truck. The DoTruck function takes in three arguments. The first is the health of the truck, the second it the amount of AI soldiers not including the driver(so the amount of AI soldiers in the back) and the last line tells the truck to stop or not if an enemy in the truck has been hit. It is set to 0 right now, which means that if you shoot the driver or one of the passengers the truck will keep on driving. If you set it to 1 the truck will come to a stop if the driver or passengers are shot and the enemy AI will jump out of the truck. Try changing the value to a 1 so that you can see how the truck reacts when it is shot at.
Finally you need to add the two tanks in for the final battle. Make sure you read the other two tutorials (driving_tutorial1 and driving_tutorial2) before you start this part. Bring in the collision box of the “addon_vehicle_german_panzer-tank2” from the “test_ai.map”. Target the tanks to the collision mesh.
Key: target
Value: panzer_clip
Create a brush, press “n” to bring up your entity window and select “addon_vehicle_german_panzer-tank2”. Give it a $targetname “tank1”. Create another tank and give it a target name “tank2”. Now create a starting path for your vehiclepoint for tank1 and give it a $targetname “tank1_path”. Do the same for the 2nd tank but give your vehiclepoint a $targetname “tank2_path”. Create the rest of the path making sure to link each vehiclepoint with the previous one.
We need to now add the trigger for the tanks. Create a trigger_once brush with a $targetname “tank_objective”. Lets place an AA gun so the player can take out the tanks easier. Create a brush, press “n” to bring up your “entity” window and select “turretweapon_player_aagun”.
Add the following script to get your tanks moving:
Add this toward the top of your script with your other Init threads.
//----------------------------------------------------------------------------
InitVehicles:
//
//  Initialize level vehicles
//
//----------------------------------------------------------------------------

	thread TankTriggerWait

	end
Make sure to add this to your main:
waitthread InitVehicles
Add this at the bottom of the script:
//----------------------------------------------------------------------------
TankTriggerWait:
//----------------------------------------------------------------------------

	$tank_objective waittill trigger

	// start up the tanks...

	level.playertanktarget = $player

	$tank1 thread TankGo $tank1_path 200 panzer
	$tank2 thread TankGo $tank2_path 200 empty_panzer	// don't want anyone to come out of this tank

	level.tank_count = 0
	$tank1 thread TankObjectiveCheck
	$tank2 thread TankObjectiveCheck

	end

//----------------------------------------------------------------------
TankObjectiveCheck:
//----------------------------------------------------------------------
	level.tank_count++
	self waittill death

	level.tank_count--

	if ( level.tank_count==0 )
	{
		waitthread global/objectives.scr::add_objectives 4 3
		centerprint "You've completed all your objectives!"
	}

	end

//----------------------------------------------------------------------
TankGo local.path local.speed local.type:
//----------------------------------------------------------------------

	self thread global/vehicles_thinkers.scr::enemy_tank_think 0 local.type
	self thread drive_path local.path local.speed

	end

//----------------------------------------------------------------------
drive_path local.path local.speed:
//----------------------------------------------------------------------
	self.driving = 1

	self drive local.path local.speed 30 200 256
	self waittill drive
	if (self)
	{
		self stop
		self.driving = 0
	}

	end